博客网站及V2ray伪装配置过程记录
2025/12/9大约 6 分钟技术v2ray
博客网站及V2ray伪装配置过程记录
之前也部署过博客网站+V2ray的方案,但是由于V2ray没做伪装(只是单纯的vmess服务),可能被GFW检测到了,导致博客网站因为不能访问而重新部署好几次,最后一次停用了大半年,这次尝试用nginx(tls+blog+ws)+v2ray(vmess)的方式实现,在此做个完整的配置记录。
注:参考 论文《中国的防火长城是如何检测和封锁完全加密流量的》
中 提到了GFW的五种豁免规则,满足这五种条件的数据流量不会被封锁,第五种为如果数据包与TLS或HTTP协议的指纹相符。
补充信息
- 博客网站(nginx https)
- V2ray(tls+ws+vmess)
- 使用系统 Ubuntu22.04
- 当前时间 2025-12-09
安装配置Nginx
for Ubuntu
nginx:Linux 软件包
安装步骤:参考最新的nginx官方文档
# 安装必备组件:
sudo apt install curl gnupg2 ca-certificates lsb-release ubuntu-keyring

# 导入官方的 Nginx 签名密钥,以便 apt 可以验证软件包的真实性。获取密钥:
curl https://nginx.org/keys/nginx_signing.key | gpg --dearmor \
    | sudo tee /usr/share/keyrings/nginx-archive-keyring.gpg >/dev/null

# 确认下载的文件包含正确的密钥:
# 输出结果应包含完整的指纹信息 573BFD6B3D8FBC641079A6ABABF5BD827BD9BF62
gpg --dry-run --quiet --no-keyring --import --import-options import-show /usr/share/keyrings/nginx-archive-keyring.gpg

# 设置用于稳定版 nginx 软件包的 apt 仓库
echo "deb [signed-by=/usr/share/keyrings/nginx-archive-keyring.gpg] \
https://nginx.org/packages/ubuntu `lsb_release -cs` nginx" \
    | sudo tee /etc/apt/sources.list.d/nginx.list

# 设置仓库锁定,优先使用我们自己的软件包而不是发行版提供的软件包
echo -e "Package: *\nPin: origin nginx.org\nPin: release o=nginx\nPin-Priority: 900\n" \
    | sudo tee /etc/apt/preferences.d/99nginx

# 安装nginx
sudo apt update
sudo apt install nginx
配置Nginx
cp /etc/nginx/conf.d/default.conf /etc/nginx/conf.d/default.conf.bak
vi /etc/nginx/conf.d/default.conf
server{
listen 80;
# 80端口的请求全部301重定向到https
return 301 https://$host$request_uri;
}
server {
listen 443 ssl;
server_name dingdingdang.online www.dingdingdang.online;
access_log /var/www/blog/log/host.access.log main;
ssl_certificate /etc/letsencrypt/archive/dingdingdang.online/cert1.pem;
ssl_certificate_key /etc/letsencrypt/archive/dingdingdang.online/privkey1.pem;
ssl_protocols TLSv1 TLSv1.1 TLSv1.2;
ssl_ciphers HIGH:!aNULL:!MD5;
location / {
root /var/www/blog/root/;
index index.html index.htm;
}
error_page 404 /404.html;
error_page 500 502 503 504 /50x.html;
location = /50x.html {
root /usr/share/nginx/html;
}
location /v2ray {
proxy_redirect off;
proxy_pass http://127.0.0.1:2000; # 后端v2ray代理服务地址
proxy_http_version 1.1; # 强制使用HTTP/1.1
# websocket
proxy_set_header Upgrade $http_upgrade; # 传递Upgrade头
proxy_set_header Connection "upgrade"; # 传递Connection头
proxy_set_header Host $http_host; # 保持Host信息
# Show realip in v2ray access.log
proxy_set_header X-Real-IP $remote_addr;
proxy_set_header X-Forwarded-For $proxy_add_x_forwarded_for;
}
}获取https证书
安装Certbot获取Let'sEncrypt颁发的tls/https证书
- 需安装好Nginx
- 需提配置好域名的ip地址
最好参考最新的官方文档
# 安装 snapd(软件包管理器)
sudo apt update
sudo apt install snapd


# 移除使用系统默认 软件包管理器 安装的 certbot
sudo apt-get remove certbot


# 使用 snapd 安装 Certbot
sudo snap install --classic certbot


# 软连接 确保可执行
sudo ln -s /snap/bin/certbot /usr/bin/certbot


# 选择希望如何运行 Certbot
# (运行此命令即可获取证书,并让 Certbot 自动编辑您的 nginx 配置以提供服务,一步即可启用 HTTPS 访问。)
sudo certbot --nginx
# (或者只拷贝证书,自己手动更改 nginx 配置)
sudo certbot certonly --nginx


# 测试自动续订
# (certbot 软件包自带 cron 任务或 systemd 定时器,会在证书过期前自动续订。除非更改配置,否则无需再次运行 Certbot。)
sudo certbot renew --dry-run

root@iZj6c0fld2g6j6iisyc6zqZ:/etc/nginx# ls /etc/letsencrypt/archive/dingdingdang.online/
cert1.pem  chain1.pem  fullchain1.pem  privkey1.pem
配置 GitHub Actions 自动部署博客网站
为github服务器 生成rsa私钥和公钥
# 创建用户 github
root@iZj6c0fld2g6j6iisyc6zqZ:~# adduser github
info: Adding user `github' ...
info: Selecting UID/GID from range 1000 to 59999 ...
info: Adding new group `github' (1001) ...
info: Adding new user `github' (1001) with group `github (1001)' ...
info: Creating home directory `/home/github' ...
info: Copying files from `/etc/skel' ...

# 创建私钥和公钥
root@iZj6c0fld2g6j6iisyc6zqZ:~# su github
github@iZj6c0fld2g6j6iisyc6zqZ:/root$ cd
github@iZj6c0fld2g6j6iisyc6zqZ:~$ ls
github@iZj6c0fld2g6j6iisyc6zqZ:~$ ssh-keygen -t rsa
Generating public/private rsa key pair.
Enter file in which to save the key (/home/github/.ssh/id_rsa): ./id_rsa
Enter passphrase (empty for no passphrase):
Enter same passphrase again:
Your identification has been saved in ./id_rsa
Your public key has been saved in ./id_rsa.pub
github@iZj6c0fld2g6j6iisyc6zqZ:~$ ls -al
total 28
drwxr-x--- 2 github github 4096 Dec  8 14:00 .
drwxr-xr-x 4 root   root   4096 Dec  8 13:58 ..
-rw-r--r-- 1 github github  220 Dec  8 13:58 .bash_logout
-rw-r--r-- 1 github github 3771 Dec  8 13:58 .bashrc
-rw------- 1 github github 2622 Dec  8 14:00 id_rsa
-rw-r--r-- 1 github github  584 Dec  8 14:00 id_rsa.pub
-rw-r--r-- 1 github github  807 Dec  8 13:58 .profile
查看生成的私钥
github@iZj6c0fld2g6j6iisyc6zqZ:~$ cat id_rsa
-----BEGIN OPENSSH PRIVATE KEY-----
略略略略略略略略略略略略略略略略略略
略略略略略略略略略略略略略略略略略略
略略略略略略略略略略略略略略略略略略
略略略略略略略略略略略略略略略略略略
-----END OPENSSH PRIVATE KEY-----
将生成的私钥添加到GitHub
将公钥添加到服务器的已鉴权主机列表
github@iZj6c0fld2g6j6iisyc6zqZ:~$ mkdir .ssh
github@iZj6c0fld2g6j6iisyc6zqZ:~$ cat id_rsa.pub >> .ssh/authorized_keys
删除生成的rsa公钥和密钥
github@iZj6c0fld2g6j6iisyc6zqZ:~$ rm id_rsa id_rsa.pub创建网站根目录和日志目录 并修改所有者
#
root@iZj6c0fld2g6j6iisyc6zqZ:~# mkdir /var/www/blog/root/ -p
root@iZj6c0fld2g6j6iisyc6zqZ:~# mkdir /var/www/blog/log/ -p

# 根目录的所有者为GitHub 确保github的服务器只能操作这个文件夹
# 根目录的所有组为nginx 确保网站能够访问
# 日志目录的所有者为nginx 以便其能够记录日志
root@iZj6c0fld2g6j6iisyc6zqZ:~/# chown -R github:nginx /var/www/blog/root/
root@iZj6c0fld2g6j6iisyc6zqZ:~/# chown -R nginx:nginx /var/www/blog/log/
修改 github workflows 实现自动使用命令更新博客网站内容
name: Deploy Blog
on:
push:
branches: [master]
permissions:
contents: write
pages: write
id-token: write # 必需权限
jobs:
build-and-deploy:
runs-on: ubuntu-latest
environment:
name: github-pages
steps:
# 1. 拉取仓库
- name: Pull Repository
uses: actions/checkout@v4
with:
submodules: true
fetch-depth: 0
# 2. 配置 Node.js
- name: Setup Node
uses: actions/setup-node@v4
with:
node-version: 22
cache: "npm"
# 3. 构建静态网站
- name: Build Pages
run: |
npm i -D @rollup/rollup-linux-x64-gnu --legacy-peer-deps
npm install --legacy-peer-deps
npm run build
# 4. 推送到 static-pages 分支
- name: Push static files to branch
uses: JamesIves/github-pages-deploy-action@v4
with:
folder: "blog/.vuepress/dist"
branch: static-pages
# 5. 推送到远程服务器
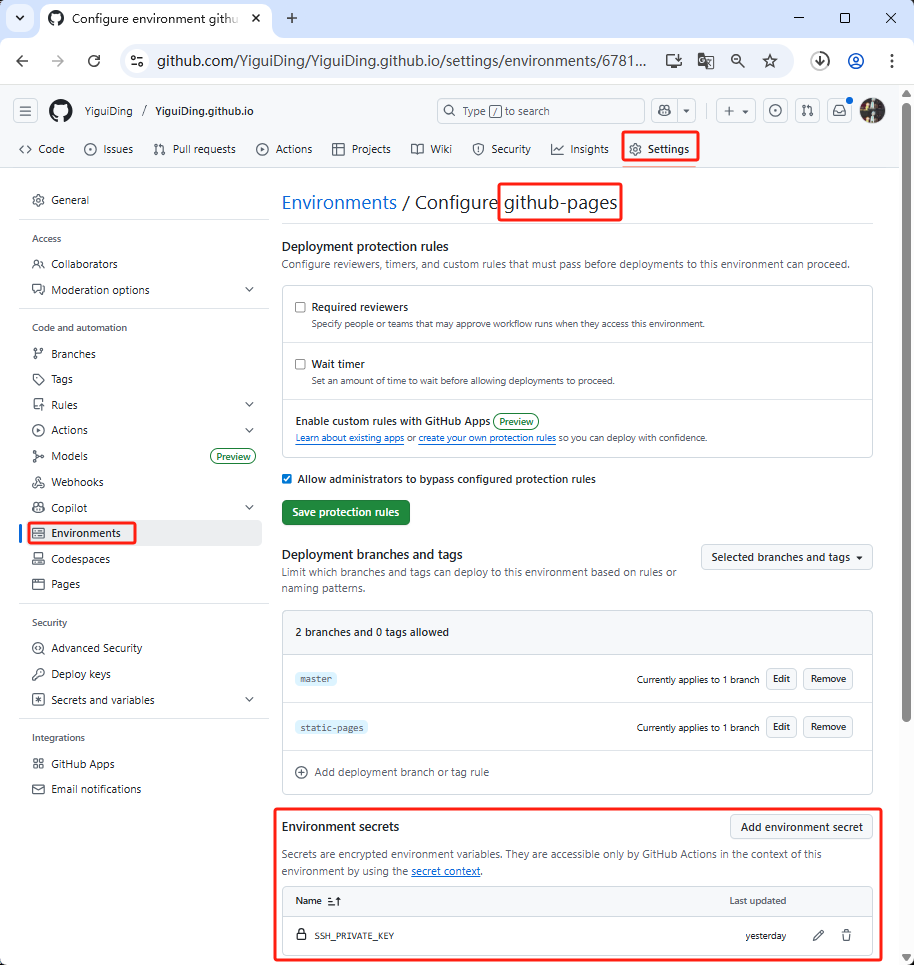
- uses: webfactory/ssh-agent@v0.8.0
with:
ssh-private-key: ${{ secrets.SSH_PRIVATE_KEY }}
- run: |
ssh-keyscan dingdingdang.online >> ~/.ssh/known_hosts
rsync -avz --delete ./blog/.vuepress/dist/ github@dingdingdang.online:/var/www/blog/root/修改 GitHub Pages 配置
- 设置
Source为static-pages分支 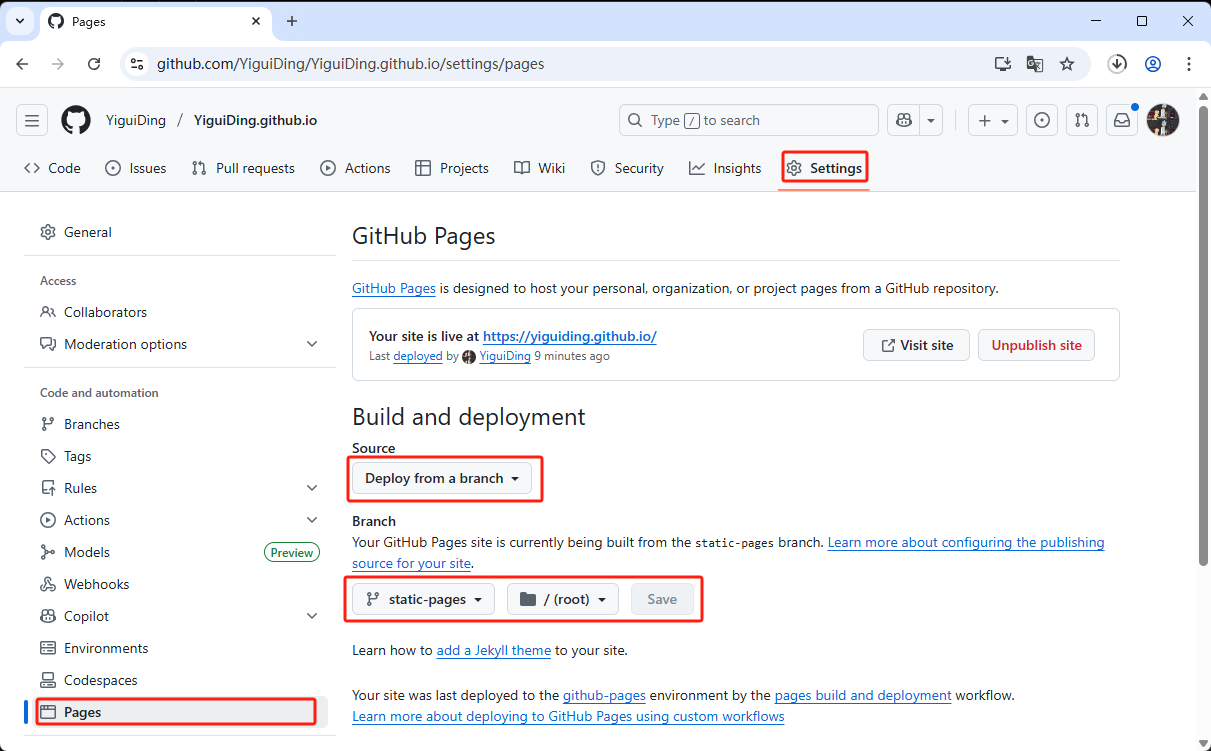
安装配置v2ray
安装v2ray
# 更新软件源
root@iZj6c0fld2g6j6iisyc6zqZ:~# apt update
root@iZj6c0fld2g6j6iisyc6zqZ:~# bash <(curl -L https://raw.githubusercontent.com/v2fly/fhs-install-v2ray/master/install-release.sh)

info: unzip is installed.
info: Extract the V2Ray package to /tmp/tmp.qmD91kuUeS and prepare it for installation.
info: Systemd service files have been installed successfully!
warning: The following are the actual parameters for the v2ray service startup.
warning: Please make sure the configuration file path is correctly set.
# /etc/systemd/system/v2ray.service
[Unit]
Description=V2Ray Service
Documentation=https://www.v2fly.org/
After=network.target nss-lookup.target

[Service]
User=nobody
CapabilityBoundingSet=CAP_NET_ADMIN CAP_NET_BIND_SERVICE
AmbientCapabilities=CAP_NET_ADMIN CAP_NET_BIND_SERVICE
NoNewPrivileges=true
ExecStart=/usr/local/bin/v2ray run -config /usr/local/etc/v2ray/config.json
Restart=on-failure
RestartPreventExitStatus=23

[Install]
WantedBy=multi-user.target

# /etc/systemd/system/v2ray.service.d/10-donot_touch_single_conf.conf
# In case you have a good reason to do so, duplicate this file in the same directory and make your customizes there.
# Or all changes you made will be lost!  # Refer: https://www.freedesktop.org/software/systemd/man/systemd.unit.html
[Service]
ExecStart=
ExecStart=/usr/local/bin/v2ray run -config /usr/local/etc/v2ray/config.json

installed: /usr/local/bin/v2ray
installed: /usr/local/share/v2ray/geoip.dat
installed: /usr/local/share/v2ray/geosite.dat
installed: /usr/local/etc/v2ray/config.json
installed: /var/log/v2ray/
installed: /var/log/v2ray/access.log
installed: /var/log/v2ray/error.log
installed: /etc/systemd/system/v2ray.service
installed: /etc/systemd/system/v2ray@.service
removed: /tmp/tmp.qmD91kuUeS
info: V2Ray v5.41.0 is installed.
You may need to execute a command to remove dependent software: apt purge curl unzip
Please execute the command: systemctl enable v2ray; systemctl start v2ray
配置为vmess协议
settings.clients[]
- clients[].id UUID生成器
- clients[].alterId 推荐值为 0 代表启用 VMessAEAD
root@iZj6c0fld2g6j6iisyc6zqZ:~# vi /usr/local/etc/v2ray/config.json{
"inbounds": [
{
"listen": "0.0.0.0",
"port": 2000,
"protocol": "vmess",
"settings": {
"clients": [
{
"id": "uuiduuid-uuid-uuid-uuid-uuiduuid",
"alterId": 0
}
]
}
}
],
"outbounds": [
{
"protocol": "freedom"
}
]
}配置为web(nginx) + tls(nginx https) + ws(nginx proxy) + v2ray(vmess)
root@iZj6c0fld2g6j6iisyc6zqZ:~# vi /usr/local/etc/v2ray/config.json{
"inbounds": [
{
"port": 2000,
"listen": "127.0.0.1",
"protocol": "vmess",
"settings": {
"clients": [
{
"id": "uuiduuid-uuid-uuid-uuid-uuiduuid",
"alterId": 0
}
]
},
"streamSettings": {
"network": "ws",
"wsSettings": {
"path": "/v2ray"
}
}
}
],
"outbounds": [
{
"protocol": "freedom"
}
]
}